这篇原创文章最初发表在Medium上的 Flutter Community publication。
This article has been published originally in the Flutter Community on Medium.
I’m a fan of Google Keep, I’ve been using it since it was launched. I put pending tasks, reminders for chores, almost anything needs to remember, into Keep. It’s intuitive to use, helps me stay focused on the priorities.
Since I’ve been building Flutter apps during the past two years, I think it might be interesting to make a notebook app like Keep from scratch.
The so-called ‘Flutter Keep’ app I made so far looks like:
I’m going to introduce the process in a series of articles. Key components will be added to the app during iterations, to make it easier to understand.
In this first part of the series, we’re going to set up the Flutter project, provide an authentication process, and a simple screen to show the note list. Let’s get started.
Before creating the project, you may want to enable web support via the command flutter config --enable-web, if you want the app to be able to run on Web besides Android and iOS.
Now, execute the command: flutter create flt_keep to create the Flutter Keep app, flt_keep is the package name that will be used in the import statements.
For those who are new to Flutter, please follow the Get started guide to install the SDK, and get familiar with the project structure. I will not put detailed instructions here.
Data structure
For a notebook app, the first thing to consider is how the notes should be persisted and queried.
What I concern includes:
- First, the privacy. Notes of different accounts should be separated from each other.
- Second, the app ought to work offline. Users should be able to take notes under any network condition. It is the app’s responsibility to sync the data when network connectivity recovers.
My choice is Cloud Firestore, mainly because of the experience I gained from previous projects, but also because it is straightforward to adapt.
I decided to use a dedicated collection to store each user’s notes, one document for a single note. For the reasons:
- Better segregate each account’s data
- Easy to query
- Avoids some limitations in reading & writing data
This approach also comes with a cost, but it is acceptable for a demonstration purpose. That is, I have to create indexes for each collection dynamically, I’ll discuss the issue in a later article.
For now, the data structure is like:

App architecture
Now it’s time to consider how to organize the app logic. It won’t worth it to apply a ‘real’ architecture to an app mostly for demonstration. But there’s still a need to manage states across multiple screens in the app.
In this case, we’re going to use the provider package to manage the app state. It allows us to write code in a reactive (or data-driven) style.
The most important screens in the app include:
- The authentication screen, watching the signed-in state, makes sure that only authenticated users can take notes
- The note list screen, displaying the most recent state of the notes, should react to changes to any note
- The note editor should also be reactive to outside modifications of the particular note being edited
Via providers, we can fulfill the above requirements easier, with a cleaner codebase.
With the scheme in mind, let’s begin writing the code.
To use provider and the Firebase toolkits, we have to add the dependencies to pubspec.yaml:
provider: ^4.0.2
firebase_core: ^0.4.4
firebase_auth: ^0.15.4
cloud_firestore: ^0.13.3
google_sign_in: ^4.1.4
Please follow the detailed instructions to set up for both Android and iOS, also the Web platform.
Entry of the app
Remember that we have to reject unauthenticated users, let’s build a gatekeeper widget to the root.
void main() => runApp(NotesApp());

/// Root widget of the application.
class NotesApp extends StatelessWidget {
  @override
  Widget build(BuildContext context) => StreamProvider.value(
    initialData: CurrentUser.initial,
    value: FirebaseAuth.instance.onAuthStateChanged.map((user) => CurrentUser.create(user)),
    child: Consumer<CurrentUser>(
      builder: (context, user, _) => MaterialApp(
        title: 'Flutter Keep',
        home: user.isInitialValue
          ? Scaffold(body: const Text('Loading...'))
          : user.data != null ? HomeScreen() : LoginScreen(),
      ),
    ),
  );
}
The StreamProvider/Consumer pair here is to watch the onAuthStateChanged, a stream of Firebase authentication events, whenever the signed-in state has changed, the Consumer will get notified and re-build the widget according to the current state.
A little trick here is to use a CurrentUser to wrap the FirebaseUser, to distinguish the default initial and the unauthenticated state, both of which are null.
class CurrentUser {
  final bool isInitialValue;
  final FirebaseUser data;

  const CurrentUser._(this.data, this.isInitialValue);
  factory CurrentUser.create(FirebaseUser data) => CurrentUser._(data, false);

  /// The inital empty instance.
  static const initial = CurrentUser._(null, true);
}
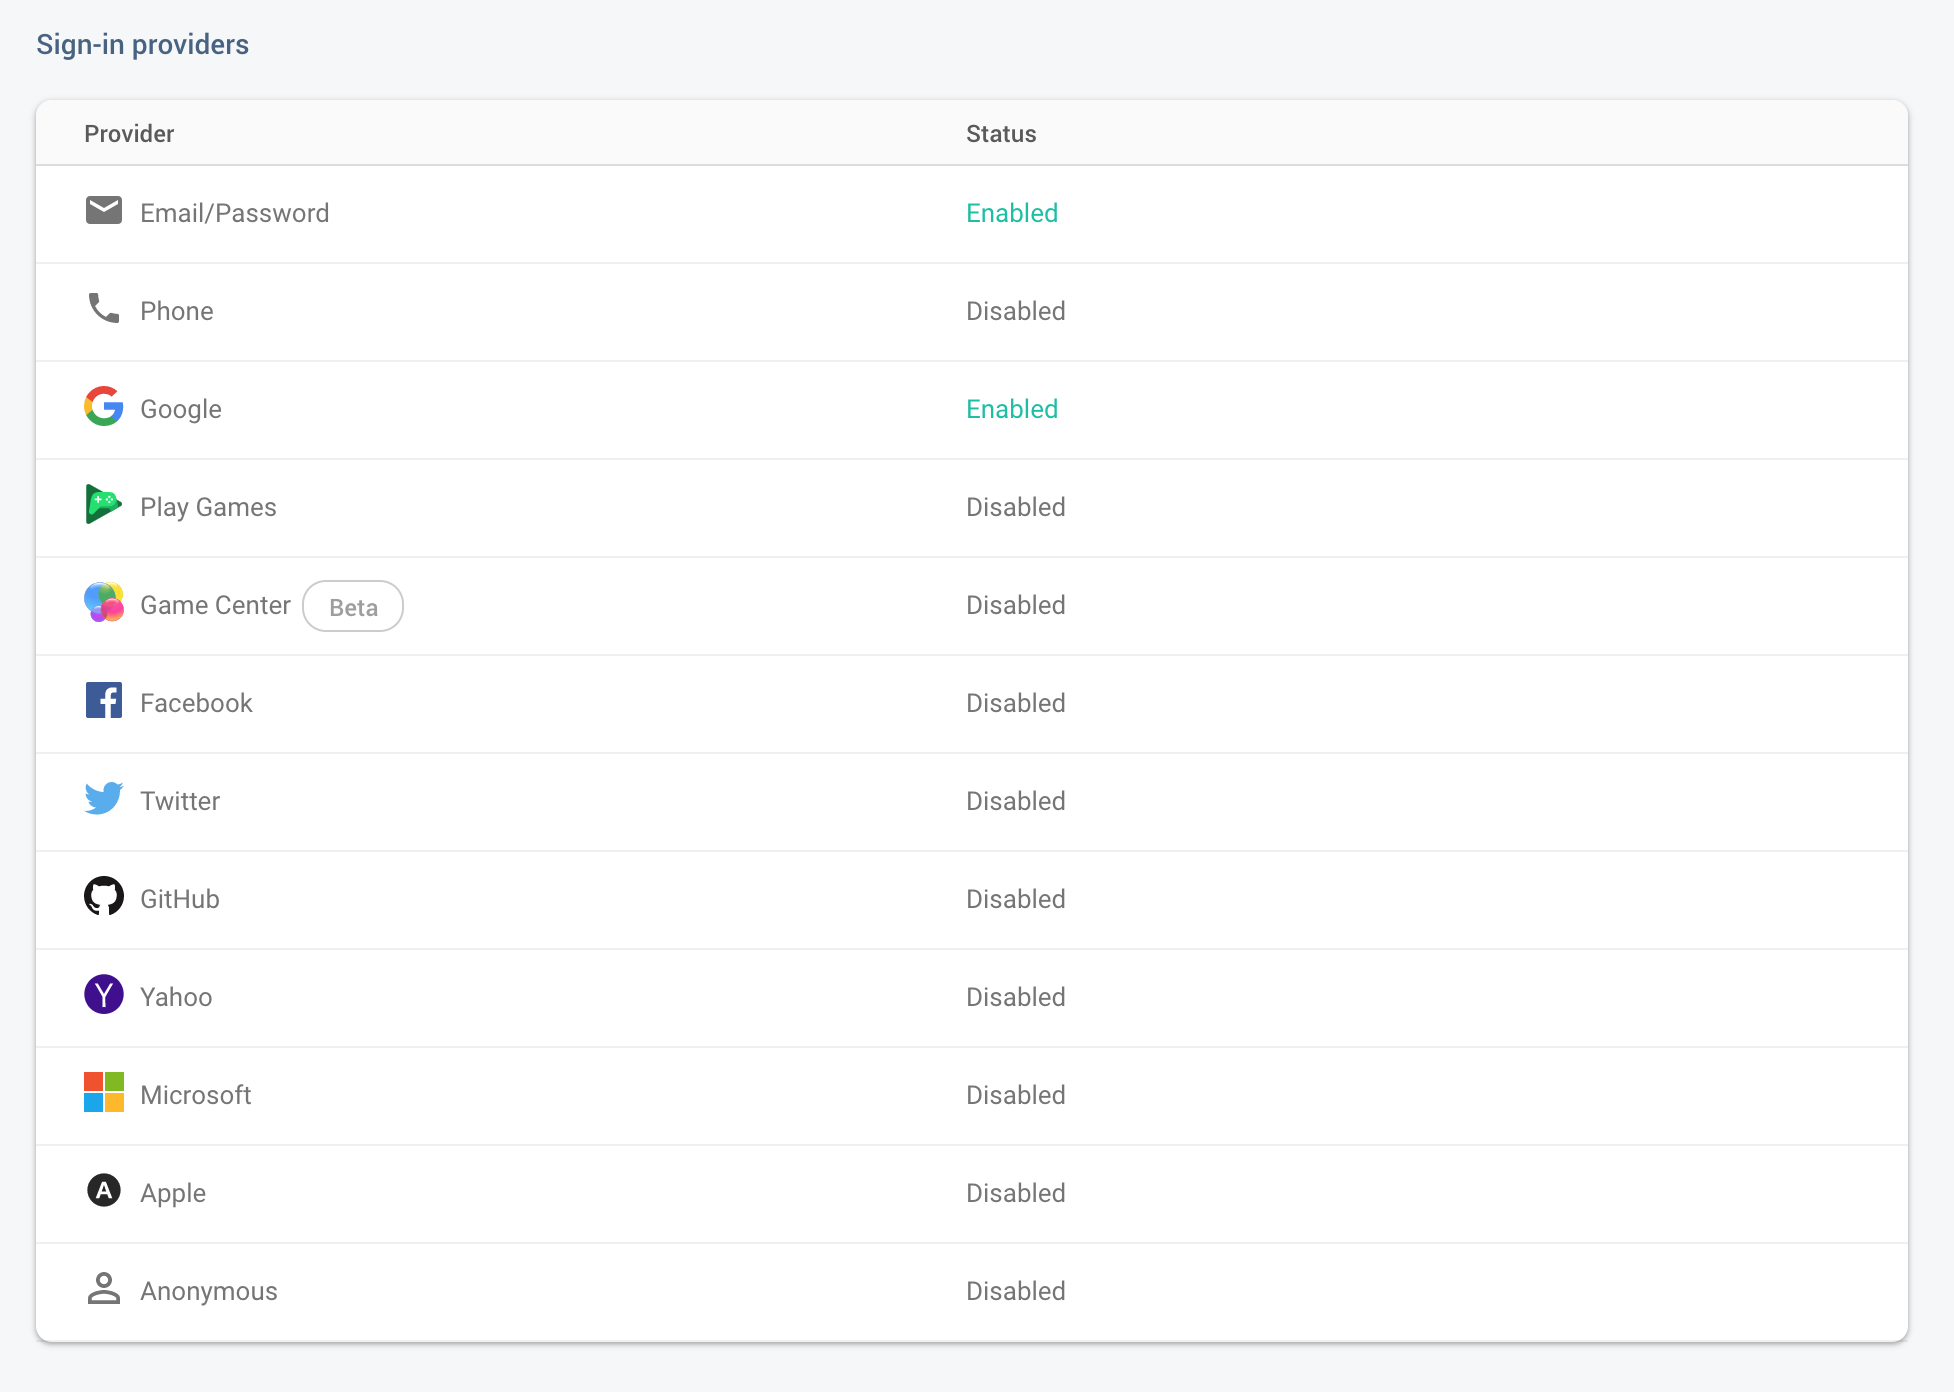
Google Sign-in & Firebase Auth
I use Google Sign-in as an example because it’s easy to integrate. In fact, it is just one of the many services supported by Firebase Auth. You can enable what you need in the Firebase console.
The code snippet to authenticate using Google Sign-In:
class LoginScreen extends StatefulWidget {
  @override
  State<StatefulWidget> createState() => _LoginScreenState();
}

class _LoginScreenState extends State<LoginScreen> {
  final _auth = FirebaseAuth.instance;
  final _googleSignIn = GoogleSignIn();
  String _errorMessage;

  @override
  Widget build(BuildContext context) => Scaffold(
    body: Center(
      child: Column(
        children: <Widget>[
          RaisedButton(
            onPressed: _signInWithGoogle,
            child: const Text('Continue with Google'),
          ),
          if (_errorMessage != null) Text(
            _errorMessage,
            style: const TextStyle(color: Colors.red),
          ),
        ],
      ),
    ),
  );

  void _signInWithGoogle() async {
    _setLoggingIn(); // show progress
    String errMsg;

    try {
      final googleUser = await _googleSignIn.signIn();
      final googleAuth = await googleUser.authentication;
      final credential = GoogleAuthProvider.getCredential(
        idToken: googleAuth.idToken,
        accessToken: googleAuth.accessToken,
      );
      await _auth.signInWithCredential(credential);
    } catch (e) {
      errMsg = 'Login failed, please try again later.';
    } finally {
      _setLoggingIn(false, errMsg); // always stop the progress indicator
    }
  }

  /// update the logging-in indicator, & show error message if any
  void _setLoggingIn([bool loggingIn = true, String errMsg]) {
    if (mounted) {
      setState(() {
        _loggingIn = loggingIn;
        _errorMessage = errMsg;
      });
    }
  }
}
Just ask for a Google Sign-In credential, and then use it to authenticate with Firebase.
You can see that there’s nothing to do after the authentication finished successfully. In this situation, the FirebaseAuth.onAuthStateChanged stream emits a Signed-in event, which triggers a re-build of the root gatekeeper widget so that the HomeScreen is rendered.
The above is an example of Reactive Programming: just mutate the state, the listeners who concern about the state will do the remaining jobs.
Back to the project, before testing your login screen, please make sure you’re not ignoring the following settings:
- For the Android platform, you must specify the SHA-1 fingerprint in the Firebase console
- For the iOS platform, you have to add a custom URL scheme to the Xcode project
- For the Web platform, add a meta tag like
<meta name="google-signin-client_id" content="{client_id}">toweb/index.html, you can find the Web client id in the ‘OAuth 2.0 Client IDs’ section of your project’s credentials page in the Google Cloud console
Querying notes
With an authenticated user, we can now enter the main screen of the app, the note list.
But how can you add the first note without a note editor? You can do this with the Firebase Console:
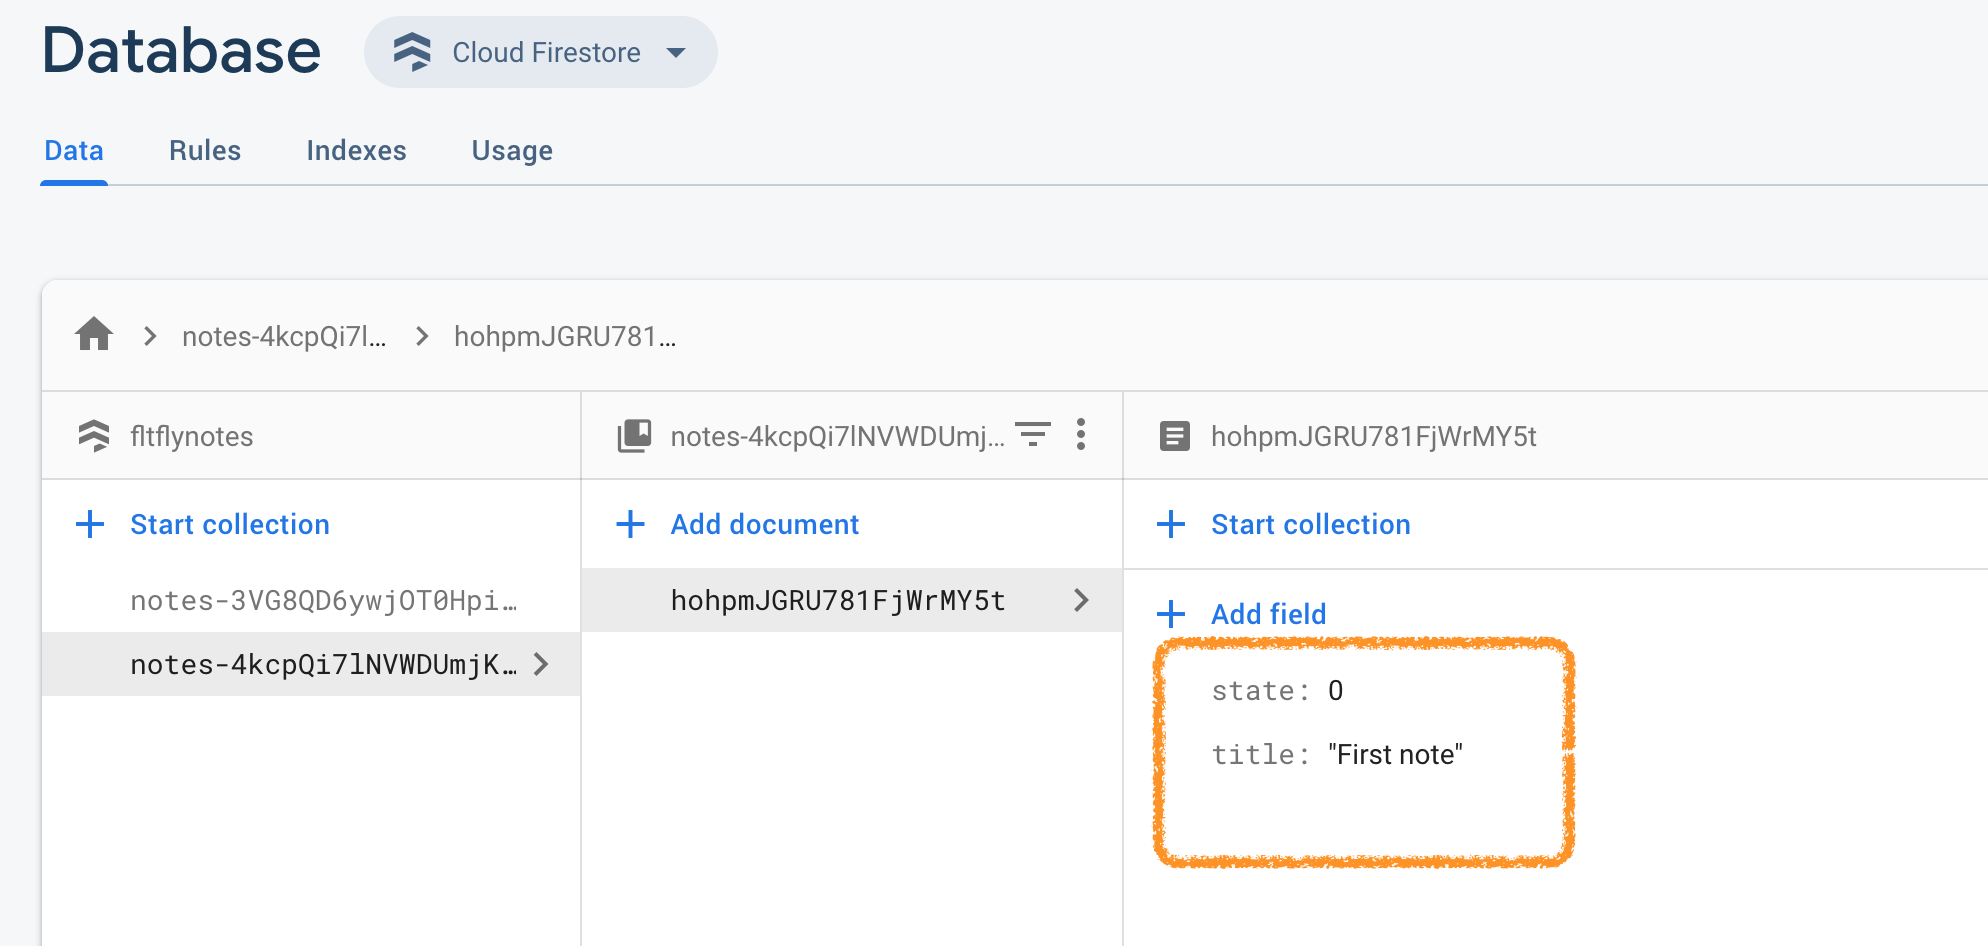
Please name the collection as notes-{user_id}, and you can find your user id in the Authentication page of the Firebase Console.
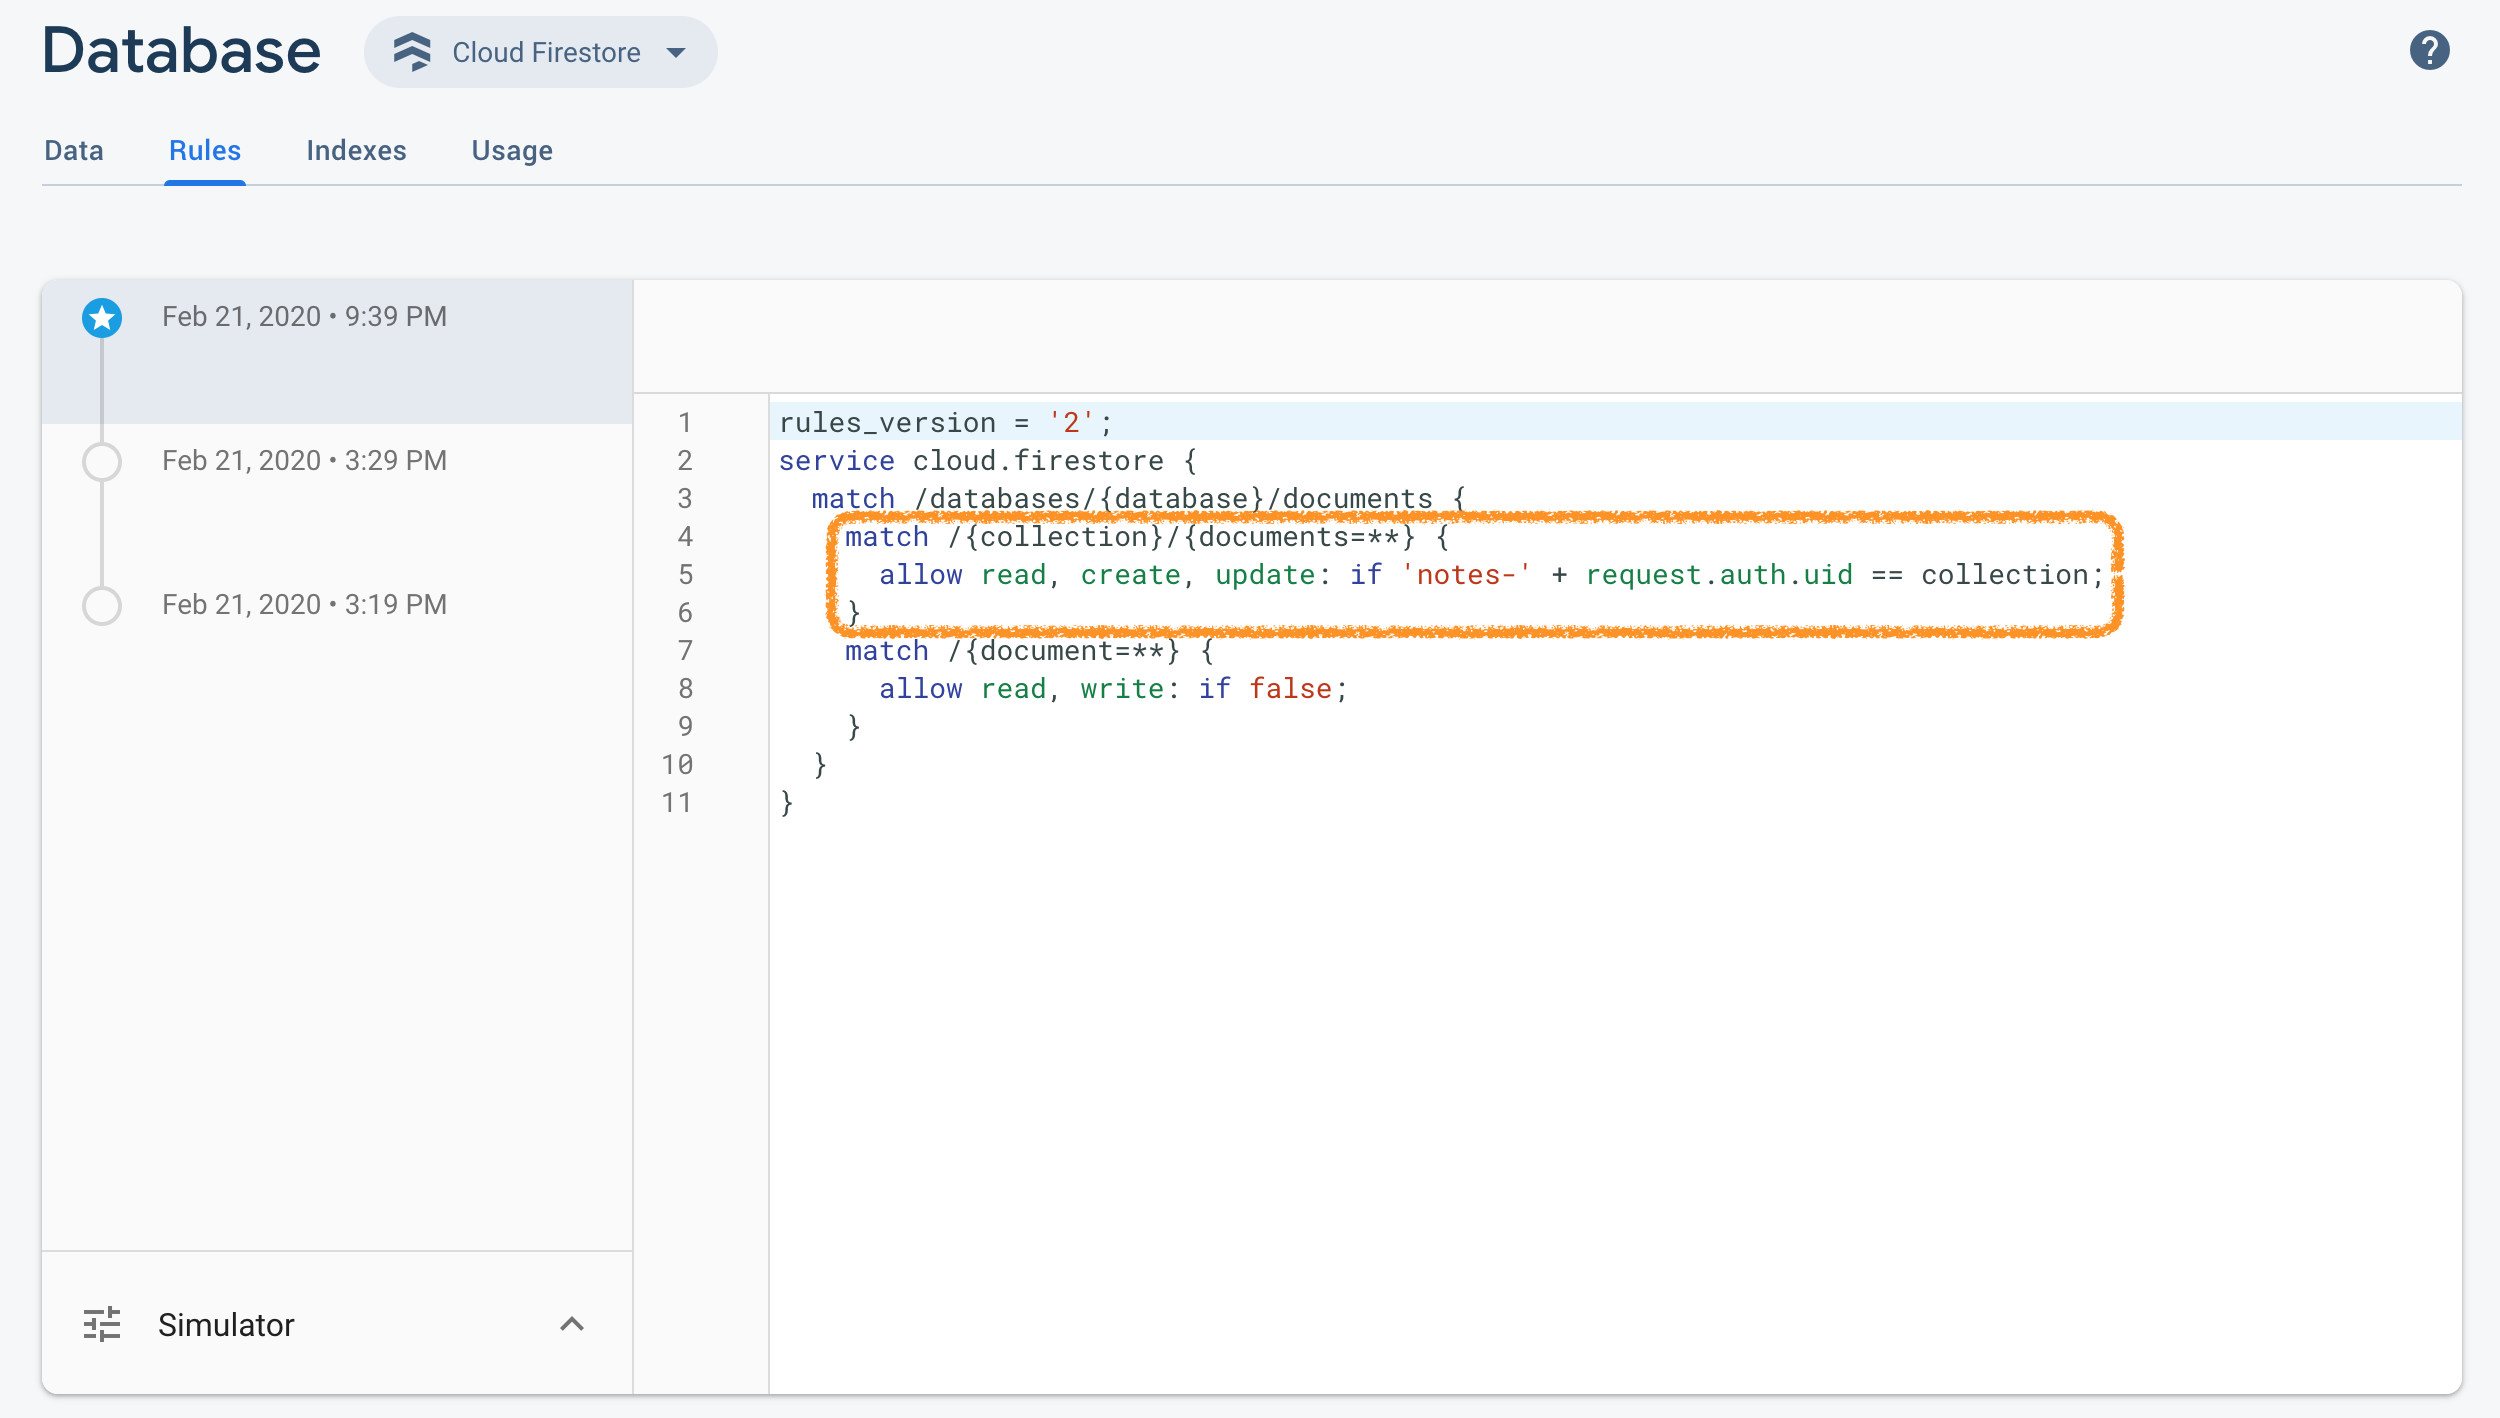
To reinforce privacy security, you may also want to set access rules against the dataset, making sure that users can only see & edit their own notes.
Before we can retrieve notes from Firestore, we need a model that represents an individual note, and functions to transform between the Firestore model and our own.
class Note {
  final String id;
  String title;
  String content;
  Color color;
  NoteState state;
  final DateTime createdAt;
  DateTime modifiedAt;

  /// Instantiates a [Note].
  Note({
    this.id,
    this.title,
    this.content,
    this.color,
    this.state,
    DateTime createdAt,
    DateTime modifiedAt,
  }) : this.createdAt = createdAt ?? DateTime.now(),
    this.modifiedAt = modifiedAt ?? DateTime.now();

  /// Transforms the Firestore query [snapshot] into a list of [Note] instances.
  static List<Note> fromQuery(QuerySnapshot snapshot) => snapshot != null ? toNotes(snapshot) : [];
}

/// State enum for a note.
enum NoteState {
  unspecified,
  pinned,
  archived,
  deleted,
}

/// Transforms the query result into a list of notes.
List<Note> toNotes(QuerySnapshot query) => query.documents
  .map((d) => toNote(d))
  .where((n) => n != null)
  .toList();

/// Transforms a document into a single note.
Note toNote(DocumentSnapshot doc) => doc.exists
  ? Note(
    id: doc.documentID,
    title: doc.data['title'],
    content: doc.data['content'],
    state: NoteState.values[doc.data['state'] ?? 0],
    color: _parseColor(doc.data['color']),
    createdAt: DateTime.fromMillisecondsSinceEpoch(doc.data['createdAt'] ?? 0),
    modifiedAt: DateTime.fromMillisecondsSinceEpoch(doc.data['modifiedAt'] ?? 0),
  )
  : null;

Color _parseColor(num colorInt) => Color(colorInt ?? 0xFFFFFFFF);
Again we’re going to use a StreamProvider in the HomeScreen, which watches the notes query result, so that any changes happen to the backend reflect here instantly. The Firestore SDK also delivers the offline capabilities we need, we don’t have to change the code used to access the data.
And thanks for the gatekeeper widget we built previously, which enables us to retrieve the authentication info any time via Provider.of<CurrentUser>.
/// Home screen, displays [Note] in a Grid or List.
class HomeScreen extends StatefulWidget {
  @override
  State<StatefulWidget> createState() => _HomeScreenState();
}

class _HomeScreenState extends State<HomeScreen> {
  bool _gridView = true; // `true` to show a Grid, otherwise a List.

  @override
  Widget build(BuildContext context) => StreamProvider.value(
    value: _createNoteStream(context),
    child: Scaffold(
      body: CustomScrollView(
        slivers: <Widget>[
          _appBar(context), // a floating appbar
          const SliverToBoxAdapter(
            child: SizedBox(height: 24), // top spacing
          ),
          _buildNotesView(context),
          const SliverToBoxAdapter(
            child: SizedBox(height: 80.0), // bottom spacing make sure the content can scroll above the bottom bar
          ),
        ],
      ),
      floatingActionButton: _fab(context),
      bottomNavigationBar: _bottomActions(),
      floatingActionButtonLocation: FloatingActionButtonLocation.endDocked,
      extendBody: true,
    ),
  );

  /// A floating appBar like the one of Google Keep
  Widget _appBar(BuildContext context) => SliverAppBar(
    floating: true,
    snap: true,
    title: _topActions(context),
    automaticallyImplyLeading: false,
    centerTitle: true,
    titleSpacing: 0,
    backgroundColor: Colors.transparent,
    elevation: 0,
  );

  Widget _topActions(BuildContext context) => Container(
    width: double.infinity,
    padding: const EdgeInsets.symmetric(horizontal: 20),
    child: Card(
      elevation: 2,
      child: Padding(
        padding: const EdgeInsets.symmetric(vertical: 5),
        child: Row(
          children: <Widget>[
            const SizedBox(width: 20),
            const Icon(Icons.menu),
            const Expanded(
              child: Text('Search your notes', softWrap: false),
            ),
            InkWell(
              child: Icon(_gridView ? Icons.view_list : Icons.view_module),
              onTap: () => setState(() {
                _gridView = !_gridView; // switch between list and grid style
              }),
            ),
            const SizedBox(width: 18),
            _buildAvatar(context),
            const SizedBox(width: 10),
          ],
        ),
      ),
    ),
  );

  Widget _bottomActions() => BottomAppBar(
    shape: const CircularNotchedRectangle(),
    child: Container(
      height: kBottomBarSize,
      padding: const EdgeInsets.symmetric(horizontal: 17),
      child: Row(
        ...
      ),
    ),
  );

  Widget _fab(BuildContext context) => FloatingActionButton(
    child: const Icon(Icons.add),
    onPressed: () {},
  );

  Widget _buildAvatar(BuildContext context) {
    final url = Provider.of<CurrentUser>(context)?.data?.photoUrl;
    return CircleAvatar(
      backgroundImage: url != null ? NetworkImage(url) : null,
      child: url == null ? const Icon(Icons.face) : null,
      radius: 17,
    );
  }

  /// A grid/list view to display notes
  Widget _buildNotesView(BuildContext context) => Consumer<List<Note>>(
    builder: (context, notes, _) {
      if (notes?.isNotEmpty != true) {
        return _buildBlankView();
      }

      final widget = _gridView ? NotesGrid.create : NotesList.create;
      return widget(notes: notes, onTap: (_) {});
    },
  );

  Widget _buildBlankView() => const SliverFillRemaining(
    hasScrollBody: false,
    child: Text('Notes you add appear here',
      style: TextStyle(
        color: Colors.black54,
        fontSize: 14,
      ),
    ),
  );

  /// Create the notes query
  Stream<List<Note>> _createNoteStream(BuildContext context) {
    final uid = Provider.of<CurrentUser>(context)?.data?.uid;
    return Firestore.instance.collection('notes-$uid')
      .where('state', isEqualTo: 0)
      .snapshots()
      .handleError((e) => debugPrint('query notes failed: $e'))
      .map((snapshot) => Note.fromQuery(snapshot));
  }
}
The code is a little bit verbose, for I provide here a floating AppBar looks like the one in Google Keep.
For NotesGrid and NotesList, they are much similar: just kind of a wrapper of a SliverGrid and a SliverList respectively.
class NotesGrid extends StatelessWidget {
  final List<Note> notes;
  final void Function(Note) onTap;

  const NotesGrid({Key key, this.notes, this.onTap}) : super(key: key);

  /// A static factory method can be used as a function reference
  static NotesGrid create({Key key, this.notes, this.onTap}) =>
    NotesGrid(key: key, notes: notes, onTap: onTap);

  @override
  Widget build(BuildContext context) => SliverGrid(
  ...
  );
}
I’m not posting all the detailed code here. Please find the full example in my GitHub repo.
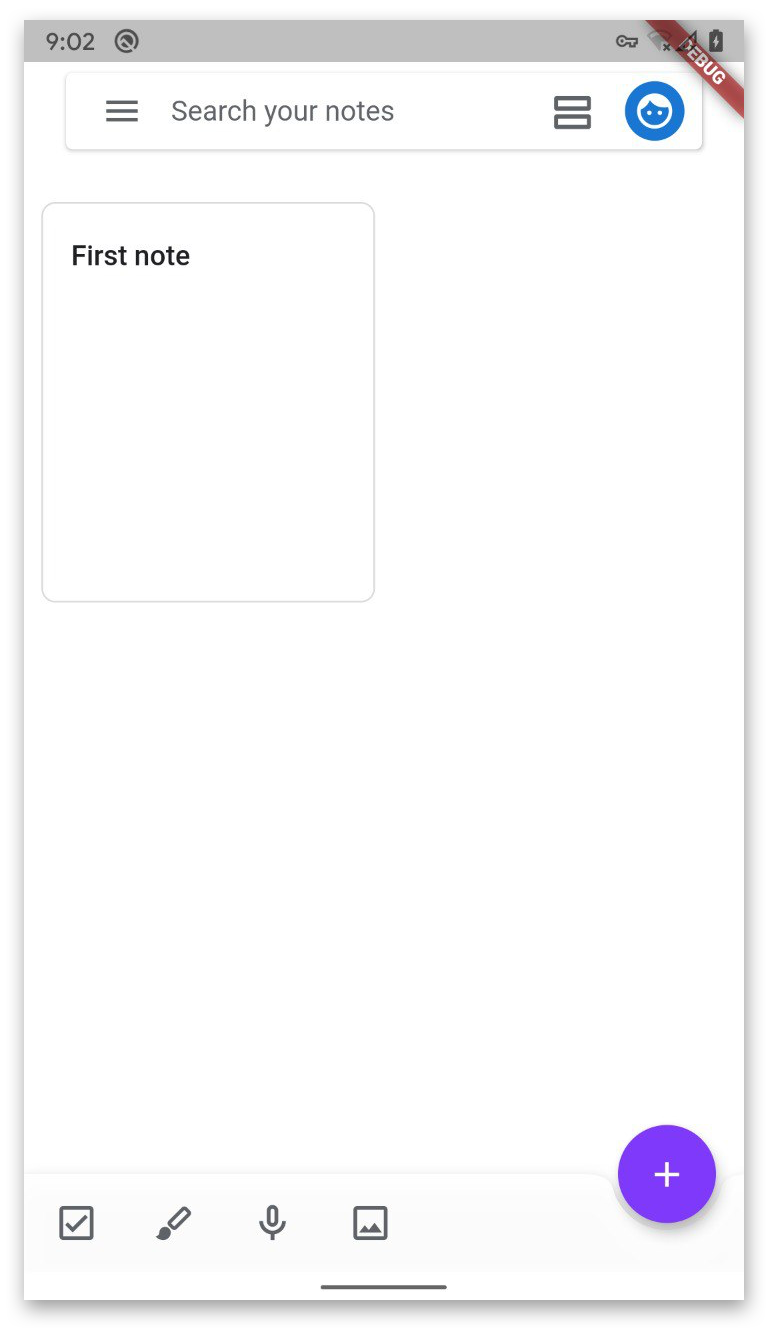
If everything goes fine, you should now be able to see the first note in your self-made Flutter Keep app!
We’re doing well so far. We’ve built a simple reactive-styled app by using the provider package, and also learned how to use the Firebase toolkits.
However, the app is less than useful without a note editor. We’ll add more functionalities to it in the next parts of the series.
Thank you for reading! 🙌
这篇原创文章最初发表在Medium上的 Flutter Community publication。
This article has been published originally in the Flutter Community on Medium.